how to set up a drum set

Setting the Stage: A Step-by-Step Guide on How To Set Up A Drum Set | 2024

Learning how to set up a drum set might sound overwhelming at first, but as a kid, there’s no better feeling than receiving your first musical instrument.

After “playing” with pots and pans, using markers as my drumsticks, and begging my parents for a drum kit for years, I couldn’t believe it when the day finally arrived.

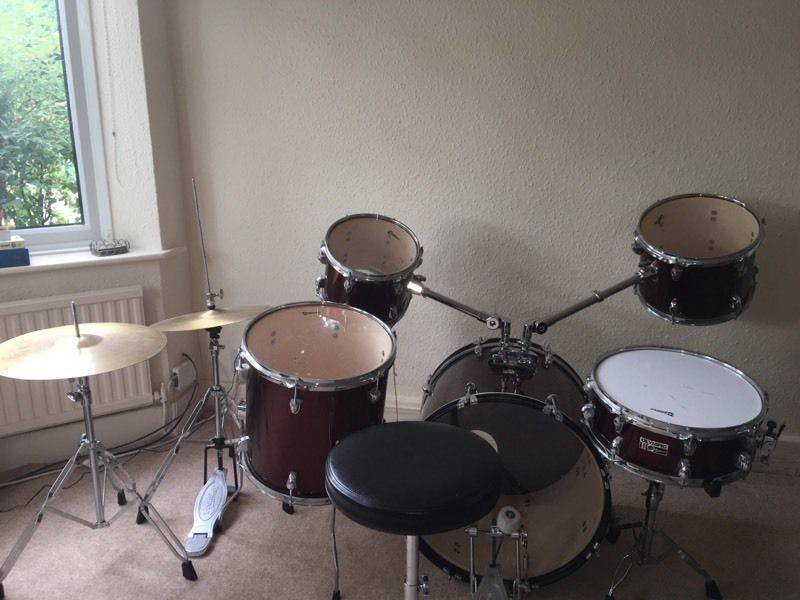
My first drum kit was a second-hand $200 Century. Standard sizes, in wine-red and off-brand hardware.

The cymbals were all Meinl Meteor and they were so dirty you could barely see the logos.

They also had plenty of drum stick marks while most drum heads had dozens of dents and sounded dead.

It didn’t matter how bad the drum set looked or how it sounded. I can still vividly remember how special that day was.

This was like three months before I even had any lessons, so I knew nothing about actually playing the drums or even how to set up a drum set.

Other musicians get their instruments, tune them (if needed) and they are ready to start playing.

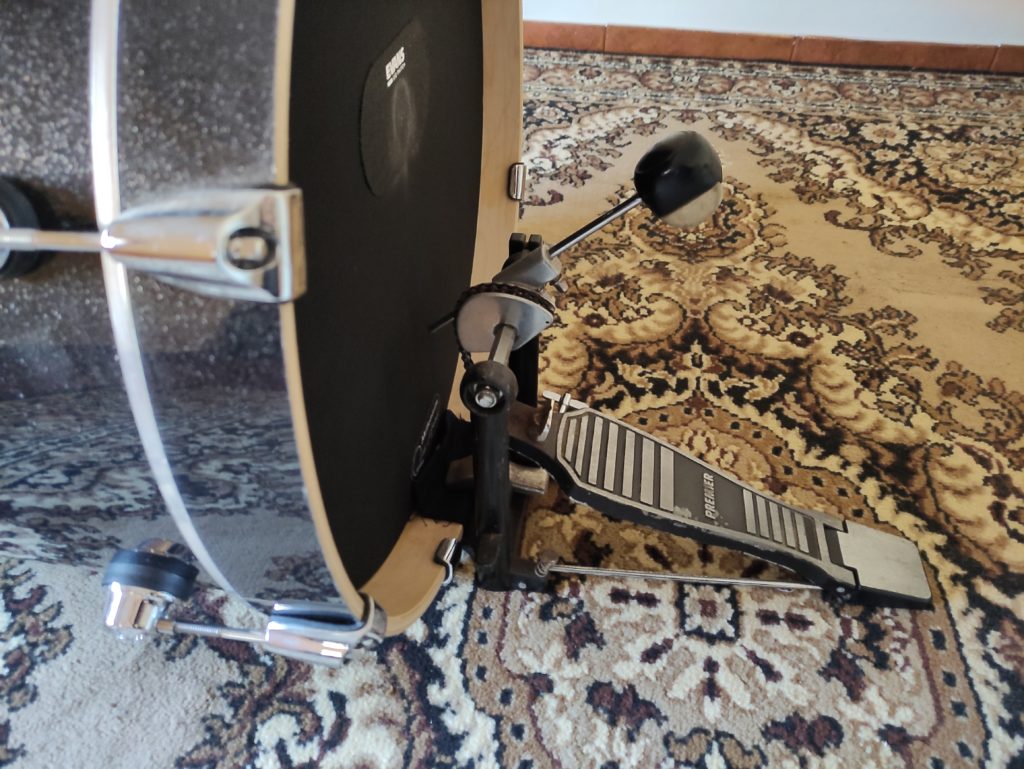
As drummers, due to the nature of our instrument, we are setting up multiple instruments, which is more complex and time-consuming.

What ends up happening most of the time, especially when we are too young to do it ourselves, is the parents are the ones struggling to set up a drum set they probably didn’t even want in the first place (sorry, mom!).

If you’re unlucky, you might end up with one of those Facebook marketplace drum sets:

 Badly Set Up Drums

No matter how hard they try, no one knows us better than we do. There’s always something to adjust after the parents’ initial attempt to set up a drum set: snare drum height and angle, drum throne’s height, cymbal’s height, and angle, and much more.

There isn’t a single correct way to set up a drum set, as it’s all a matter of personal preference, but every drummer with a little bit of experience knows exactly how they want to set up their drum set.

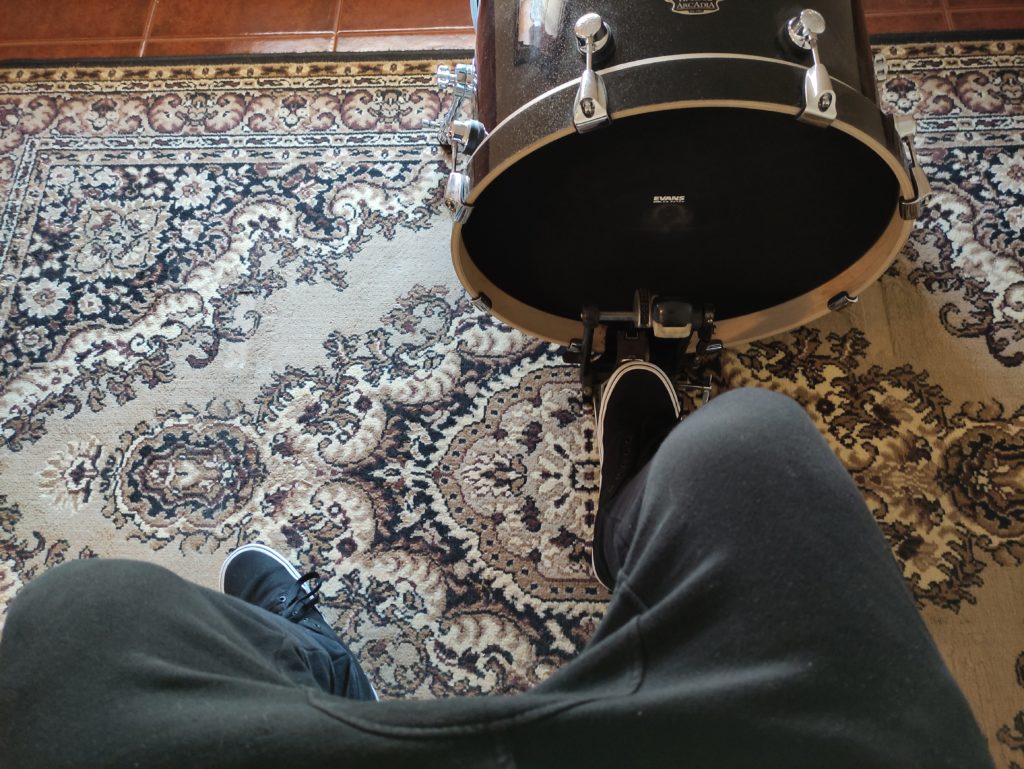
For a beginner, the most important thing is to set up your drum set ergonomically. In other words, setting up in a way where you can reach every piece of the drum kit without much effort.

If your drum kit isn’t positioned well, you’ll develop back pain, strained muscles and it will limit your progression as a musician.

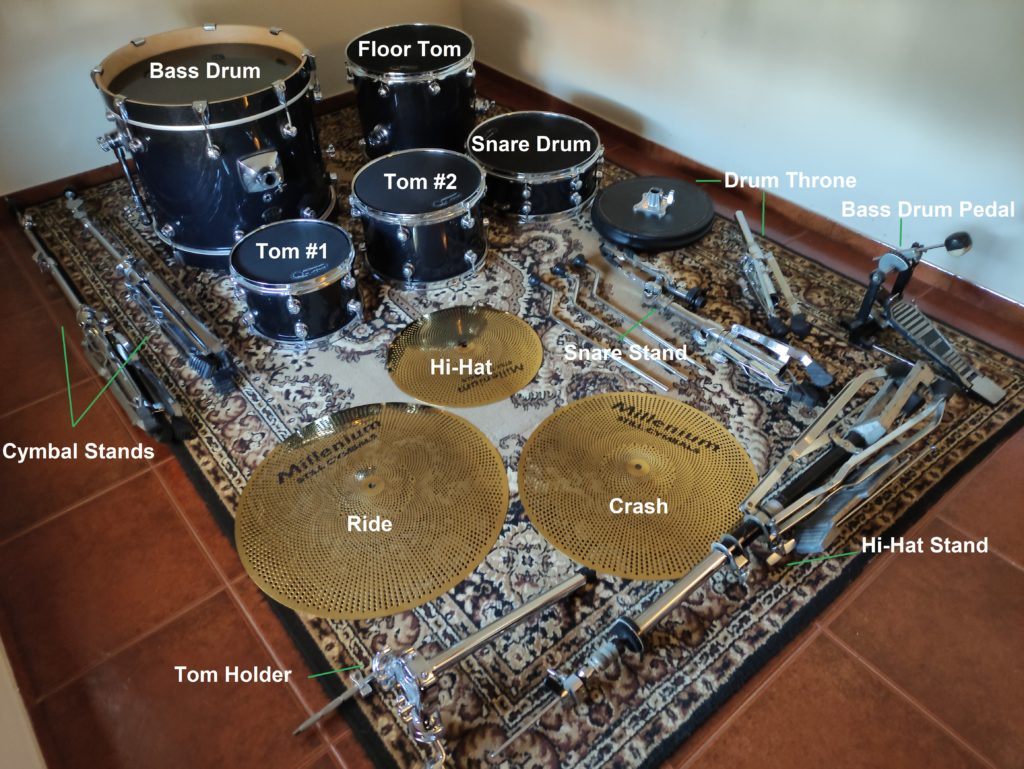
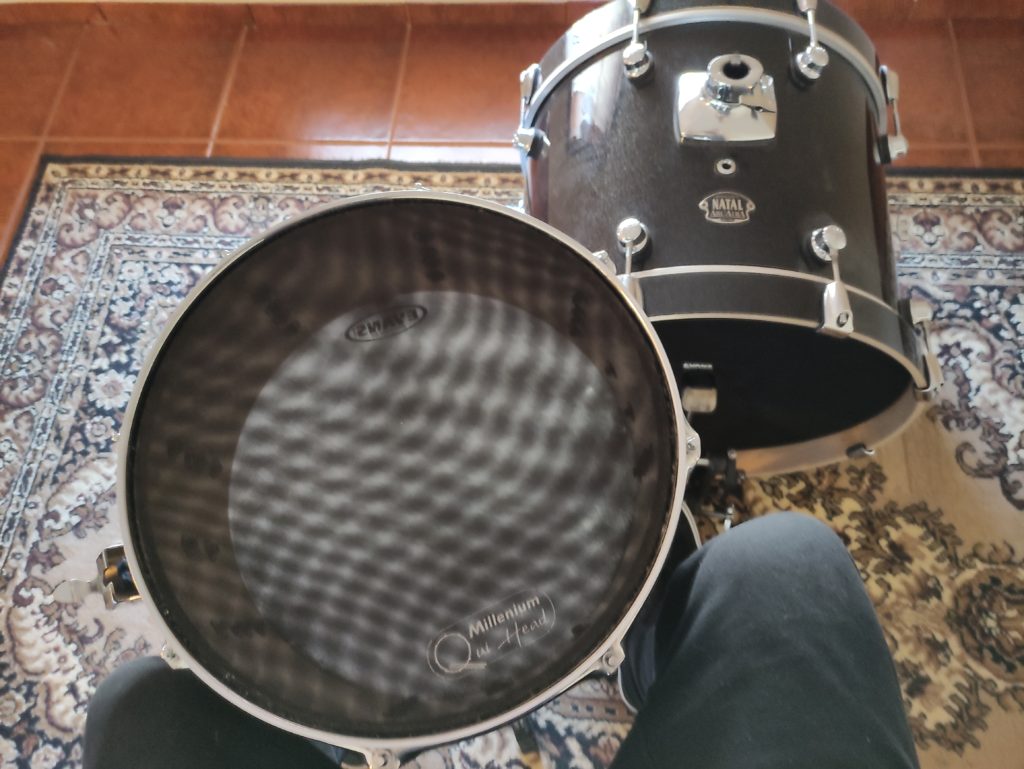
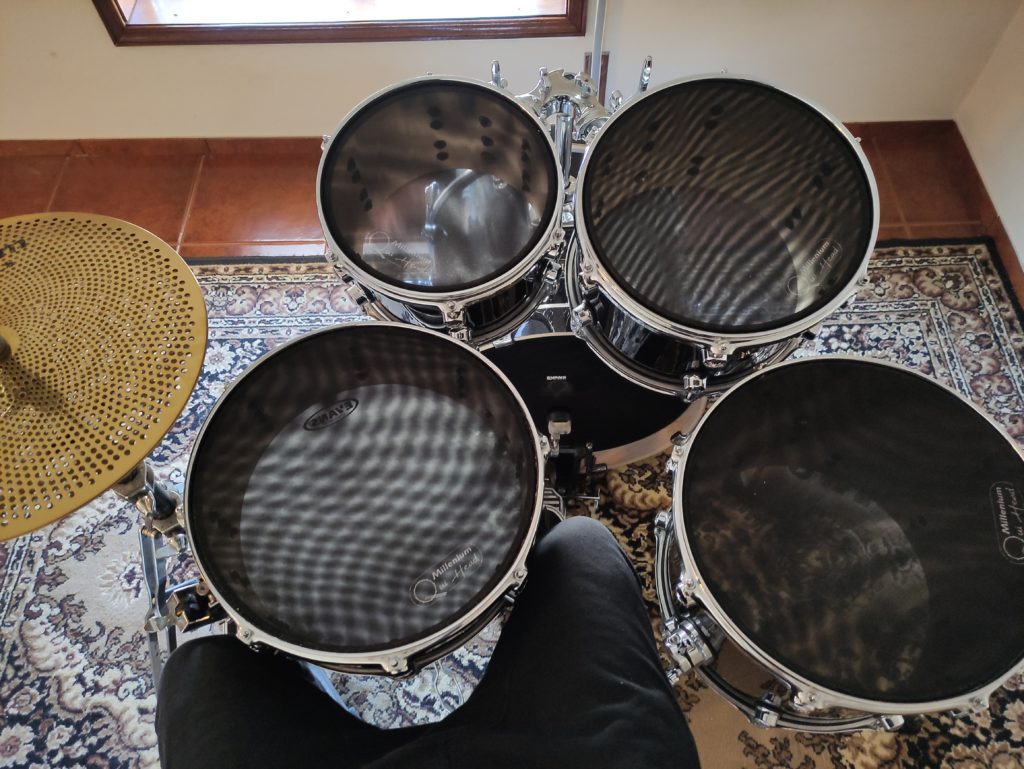
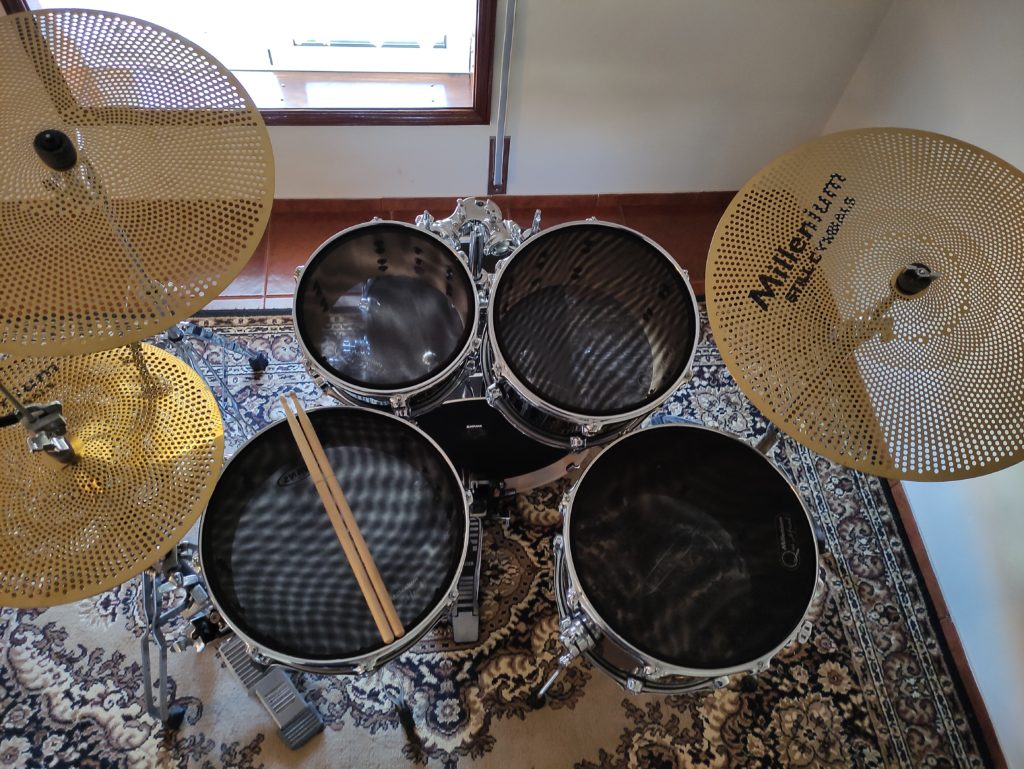
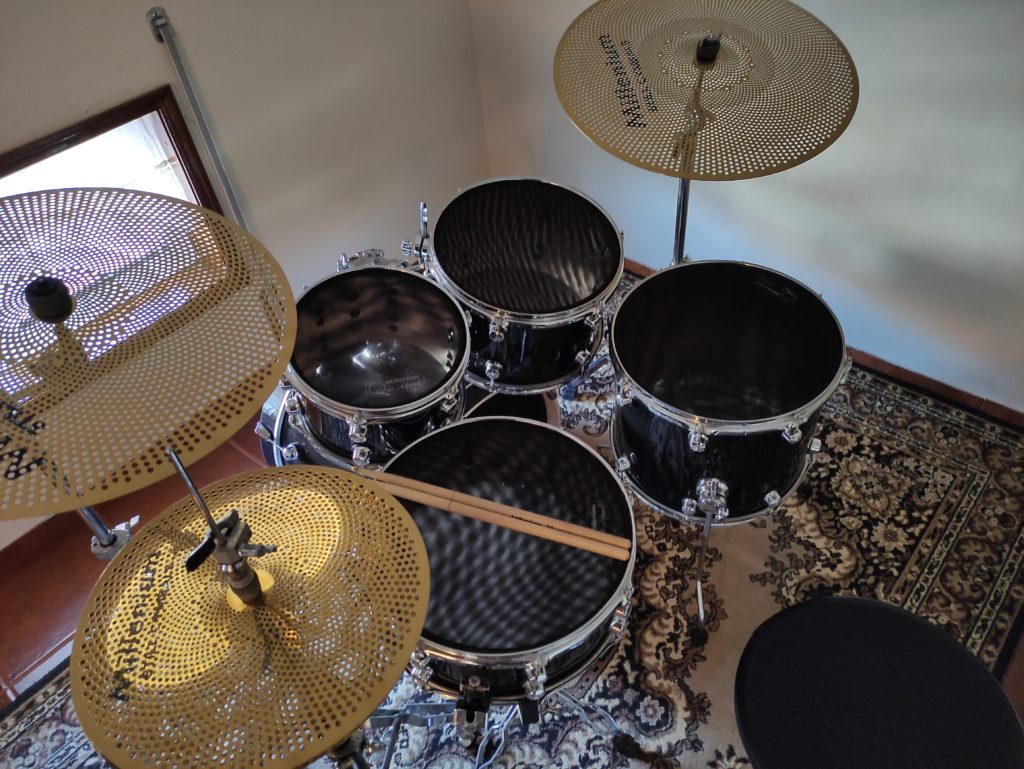
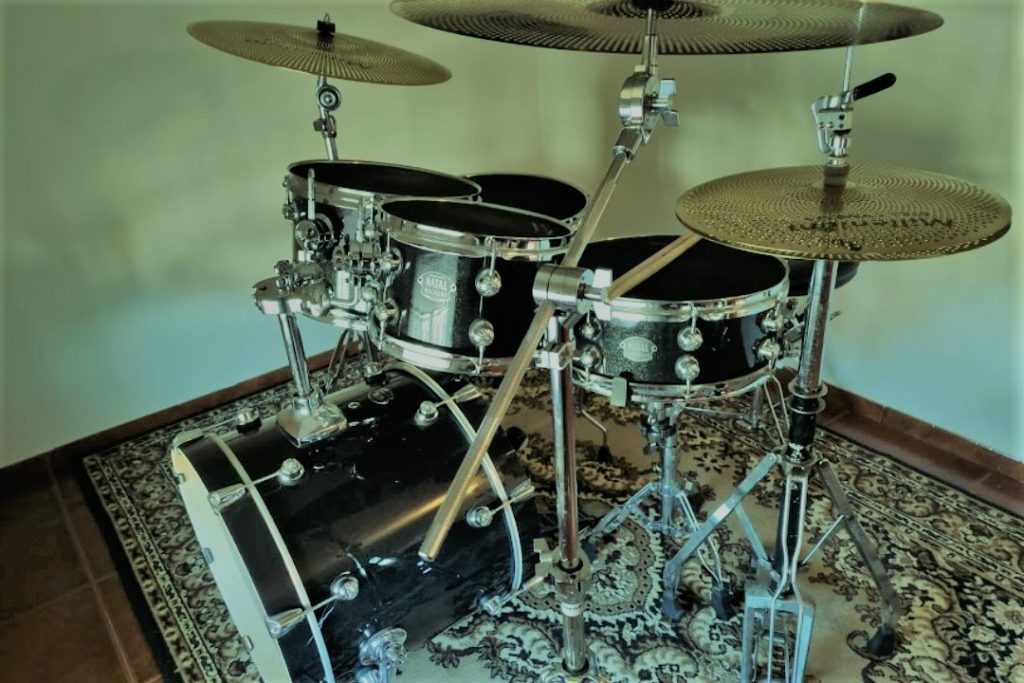
In this article, I’ll teach you how to set up every part of a 5-piece drum set with a Hi-Hat, Ride, and a Crash.

Hopefully, you (or your parents) will be able to skip a lot of the trial and error that most beginner drummers go through when they first start searching for the optimal setup.

And now, without further ado, here’s how to set up a drum set:

1- Identify The Different Parts Of A 5-piece Drum Kit

Most 5-pieces drum kits include, at least, the following parts:

  • Drums: Bass Drum, Snare Drum, Tom #1, Tom #2, Floor Tom
  • Hardware: Hi-Hat Stand, Bass Drum Pedal, Snare Drum Stand, Straight Cymbal Stand, Boom Cymbal Stand, Drum Throne
  • Cymbals: Hi-Hat, Ride, Crash

Here’s a picture of the drum set I will be using, with everything labeled so you can easily follow along:

drum set parts

2- Choose The Location For Your Drum Set

Now that you have all the pieces ready to be assembled, choose where you’re setting up your drum kit.

The location needs to have enough space for a 5-piece drum kit. If you don’t know how much space a regular 5-piece drum kit needs, 20sqft is usually a great start.

You might be able to work with less space, it all comes down to how far apart you set everything, which once again, is nothing more than personal preference.

drum set location

3- Put Down A Rug

Make sure you have a rug in hand with enough space to assemble your drum set. Many brands like Meinl sell what they like to call “drum rugs”, but to be honest, any old rug from your grandma is good enough.

It probably looks better than most “professional rugs” you can buy at the moment. Trust me, ask your grandma!

Drummers use rugs under their drum set to improve the acoustics, as it dampens drum sounds, but also, to protect the flooring, and most importantly, to stop the drum set from sliding.

Most bass drums come with spikes in their legs that dig into rugs or any similar material. You can’t do it with something like wood floors, that’s why drum rugs are so important to drummers.

drum rug

4- Decide The Direction Your Drum Set Will Face

Now that you have a location and a drum rug to place under your drum set, choose the direction where your drum kit will be facing.

A lot of drummers like to set up their drum kit facing a wall. I’m the exact opposite, I like to have the wall behind me.

It’s getting old, but once again, it all comes down to personal preference. Test both options for a while until you’re able to identify what you like the most.

5- Assemble And Place The Drum Throne

The drum throne is the foundation of your drum set, believe it or not. Besides posture and ergonomics, the drum throne’s height is also important to decide the height of the rest of your drum set.

With that in mind, it only makes sense to assemble it first:

  • Loosen the wingnut at the bottom, expand the legs until it feels stable enough, and then tighten the wingnut again;
  • Unlock the wingnut underneath the seat, line the height adjustment rod with the hole underneath the seat, and let it slide in. Once it’s in place, lock it again using the same wingnut you just unlocked;
  • Raise or lower the seat, until you find a comfortable sitting position, by adjusting the height adjustment rod. Some thrones have some sort of lever on the side, like office chairs. Others have a threaded weight adjustment where you rotate the seat to change the height. Most cheap thrones only have a tension rod that you unlock with a drum key to move the height adjustment rod and then lock when you find the sweet spot.
  • Now that your drum throne is ready to go, make sure one of the legs is pointed behind you (to prevent you from falling backward) and your legs are at a slightly above 90º angle. That prevents back and leg pain and improves your technique by allowing you to sit in a more natural position.

6- Set Up The Bass Drum

Now that your throne is in place, sit and make sure your right leg (or left, if you’re a lefty) is parallel to the right and left side of your rug.

There are a couple of different angles you can use your bass drum: either directly in front of you, or slightly angled to the right. For the sake of simplicity, let’s go with the “directly in front of you” option.

Where you have your right foot is the perfect spot to place your bass drum pedal, which we use to play the bass drum itself.

We now know where your bass drum pedal is, and therefore, your bass drum will be right in front of it:

  • Place the bass drum in front of the bass drum pedal, with the holes for the tom holder on top, and the logo head (might have a hole too) and bass drum legs facing away from you;
  • Loosen the wingnuts on both bass drum’s legs, position them so they barely lean forward (away from you), until they make contact with the floor, and slightly lift the front of your bass drum off the ground;
  • Once both legs are in an ideal position, tighten back both legs’ wingnuts;
  • Loosen the wingnut on the bottom of your bass drum pedal, and clamp it to the bass drum hoop facing you. Make sure the pedal is secure and fully flat on the floor (if not, adjust it!) and tighten the bass drum pedal wingnut. 

Note: To avoid any damage from the contact, use a bass drum hoop protector or any old cloth/cardboard in between the hoop and the clamp to prevent the bass drum hoop from getting chewed by the pedal.

bass drum placement
bass drum pedal placement

7- Adjust The Bass Drum Pedal

We are now able to play the bass drum, but before that, it’s time to adjust the bass drum pedal.

You should set up the pedal in a way where the beater is at a 45º angle while also hitting the batter head right in the center. You adjust the beater by loosening the square screw next to it.

Adjust the spring tension until it offers a resistance that you find comfortable enough for you. Don’t worry if it doesn’t feel right at first, experience is the only way to find out what works best for you.

Keep in mind that, the tighter the spring, the faster the pedal returns to its rest position, but the harder it is to play.

Test everything out to make sure it works and it’s comfortable enough to use during long periods.

8- Assemble The Snare Drum Stand And Place Your Snare

Remember when you sat on your throne to find where you would place the bass drum pedal? Now do it again, but spread your legs while keeping the right foot on the pedal. 

The space between your legs is where you’ll place your snare drum. Time to set it up in five simple steps:
  • Loosen the wing nut at the bottom to expand the legs of the snare drum stand. You can’t expand them too much because they’re in between your bass drum pedal and your Hi-Hat pedal. Once the stand feels stable enough, tighten it back up.
  • Now that the stand is in place, open the basket, loosen the basket’s adjustment nut until you’re able to set the snare drum in, and tighten it back up until your snare is secure in the basket. Make sure you place your snare with the snare wires facing down and the snare throw-off to the left (sitting perspective).
  • Loosen the middle wing nut and adjust the height of the stand. You want the top of your snare to be at the height of your hips when sitting, or slightly above. That means the height of your snare drum stand depends on how high you sit and how deep your snare drum is. Tighten it back up once you find the desired height.
  • The final touch is to adjust the angle of the snare basket by loosening the wing nut at the top. Drummers play with the snare drum tilted towards them, away from them, or fully horizontal. Be open-minded and test every option until you find what’s comfortable for you. Tighten the top wing nut when you’re done. Once tightened, you shouldn’t be able to lift the snare without the stand coming along.
  • Now that the snare is ready, just place it between your legs and as close as possible to the bass drum, without touching it or the rack tom you’re going to set up next.
setting up a snare drum

9- Mount The Rack Toms To The Bass Drum

Even though rack toms are often mounted to cymbal stands (that include a tom holder) or snare drum stands, they’re usually mounted over the bass drum using a tom holder.

There are two types of tom holders: single or double tom holders.

The double tom holder slides into a single hole on the bass drum and holds two toms at a time. The single tom holder only holds one tom at a time and in a 5-piece drum kit, you’ll need two. In this case, there will be two separate holes in the bass drum to slide in each of the single tom holders.

In my case, the drum set has a double tom holder and this is how you mount your toms:
  • Loosen the wingnut on top of your bass drum and place the tom holder into the bass drum mounting bracket located at the top, and tighten the bracket’s wingnut. Leave it high for now, since you’ll adjust the height after you set up both toms;
  • Loosen the wingnut on your smaller rack tom bracket and slide it onto the left tom arm. The right side of the tom should be close to the middle of the top of your bass drum. Repeat the process for your second rack tom but place it in the right tom arm instead. Adjust both toms as needed and tighten both bracket’s wingnuts once you find the sweet spot;
  • To make the set up more comfortable and less tiresome, loosen the wingnuts near both tom arms and angle the rack toms a little so they’re tilted towards you. Something like a 10º to 15º angle is enough for most drummers to consistently strike them both in the center of the drum head.
  • Now that both toms are in place, loosen the wingnut on top of your bass drum again and let the tube slide in. Be careful because the rack toms might hit the bass drum on the way down, so loosen it just enough for it to slowly slide in. Make them as low or as high as you want. In my case, I usually leave an inch between the right tom and the bass drum, which is enough to prevent both toms from hitting the bass drum while playing.
how to set up a drum set

10- Set Up Your Floor Tom

It’s now time to assemble your floor tom, which is probably the easiest thing to do. Drummers usually place it to the right of their right leg (assuming they’re not a lefty) and below the second rack tom. Where’s how you set it up:

  • Flip the floor tom upside down so the brackets on the side of the tom are on top;
  • Loosen each of the three wing nuts and insert the floor tom’s legs into the floor tom’s brackets;
  • Make sure every foot is facing outward so the floor tom is stable enough and doesn’t tip over.
  • Adjust the position of each tom leg so the height of the floor tom matches the height of the snare drum;
  • Tighten the three wingnuts when everything’s in place and flip the floor tom again.
  • Just like the snare, you can play with your floor tom tilted towards you, away from you, or perfectly horizontal. Adjust each leg individually until you achieve the desired set up;

11- Set Up The Hi-Hat

Now that we have all the drums ready, it’s time to place the cymbals after assembling the cymbal’s stands. Let’s start with the Hi-Hat:

  • Loosen the bottom wing nut, expand the legs until the pedal anchor isn’t touching the floor nor too high off the floor, and tighten it back up;
  • Place the two brackets of the pedal into the openings designed for this purpose under the footboard by pressing them together;
  • If it isn’t already there, screw the tension rod into the thread of the stand;
  • After removing the clutch, slide the bottom Hi-Hat (it usually says “bottom” or doesn’t have any logo) through the tension rod until it sits on top of the support felt-pad;
  • Grab the clutch, unscrew the locking nut and take one felt ring out (leave the other);
  • Place the top Hi-Hat onto the felt ring you left on the clutch, add the second felt ring and screw the locking nut again;
  • Slide the clutch with the top Hi-Hat through the tension rod;
  • Loosen the top wingnut, move the middle tube to the desired height and tighten it back. Most of the time, your sticks will be crossing over, with your right stick going over your left stick. Make sure the Hi-Hat is high enough compared to the snare to avoid the drumsticks hitting each other while playing. Around 8” is usually enough, which is half a drumstick;
  • To make the Hi-Hat functional, press the Hi-Hat pedal to bring the tension rod down 0.5” to 1” and tighten the wingnut on the clutch. Your Hi-Hats are now open with enough space to slide a drumstick in between.
  • Place the stand to the left of your snare where it doesn’t hit the snare or the first rack tom. 
how to set up a drum set

12- Set Up The Crash And The Ride

To set up cymbals like rides, crashes, chinas, and even splashes, drummers use cymbal stands that are either straight or boom.

Straight cymbal stands are more stable but less versatile while boom stands are the exact opposite.

Boom stands can be converted into straight cymbal stands by hiding the boom arm inside the upper tube.

That makes straight cymbal stands the best option for heavier cymbals with more than 20” while boom stands are often used with smaller cymbals like splashes and most crashes. 

That doesn’t mean you can’t set up a splash on a straight cymbal stand or a ride on a boom stand, it’s completely up to you and what’s available.

Here’s how you set up cymbals on a straight cymbal stand:
  • Just like we did plenty of times before, loosen the bottom wingnut and expand the stand’s legs;
  • Loosen the top wingnut until it comes off, remove one of the felt rings and place either the ride or the crash cymbal on top of the other felt ring;
  • Add the felt ring you removed in the previous step on top of the cymbal and tighten back the wingnut. 
  • Loosen the middle wingnut (sometimes there are two) to adjust the height of the stand. How high you set up your cymbals is just a matter of personal preference. I set them as low as possible without hitting any of the drums. Some folks like Forrest Rice set them as high as possible without the stands falling over.
  • If it’s a straight stand, the wingnut under the cymbal allows you to adjust the angle of your cymbal and that’s pretty much it.
If it’s a boom cymbal stand, there are a few extra steps:
  • You can find another wingnut to unlock the cymbal arm, and you can also use it to adjust the cymbal angle and placement. Just loosen the wingnut, move the arm around until you find a good spot, and tighten the wingnut back up. There’s no correct way to angle your cymbals, as drummers that set them up low usually end up with almost horizontal cymbals, while drummers that set them high are the exact opposite.
  • For boom stands, place one of the stand’s legs under the cymbal to help counterbalance the weight of the cymbal and the weight of the stand.
  • Place the stand with your crash near the Hi-Hat and the first tom, and make sure it doesn’t hit or covers too much of either. Place the stand with your ride next to the second rack tom and the floor tom and make sure it doesn’t cover too much of either.

Avoid Cracking Your Cymbals

  • Make sure you don’t tighten the top wingnut too much, because suppressing the cymbal’s natural vibrations will break it sooner than it should.
  • It doesn’t matter where you place your cymbals, as long as you can easily reach them and it’s comfortable enough for you. But you should always make sure the cymbals are angled towards you to avoid cracking the edge.
  • Every single stand should have a plastic sleeve (under the ring felt at the bottom of your cymbals) to avoid metal-on-metal contact that causes cracks around the bell.

Test The Full Kit

Congrats, you just set up a drum set for the first time in your life. Don’t worry if it wasn’t easy, it gets better with time.

Now it’s the perfect time to test it out and adjust everything that doesn’t feel right. Get creative with how you set up your drum set, this article should be used as a foundation only.

The last thing you want is any piece of your drum set to fall over, so make sure every wingnut is tightened properly. Don’t tighten them too much either, or you might break them. That, or the next time you need to disassemble your drum set, you’ll need a pair of pliers to unscrew them again.

Make sure the legs of the snare stand, Hi-Hat stand, and the Crash and Ride cymbals are spread enough to be stable even while playing.
If you notice any stand wobbling too much, spread the legs even further. There’s nothing wrong with spreading the stand’s legs even more besides taking up an unnecessary amount of floor space. Fortunately, that usually isn’t a problem in a regular 5-piece drum kit.

Your drums, cymbals, and hardware might look different, but the thought process is similar.

Don’t forget to take care of your drum set. Basic maintenance like cleaning and polishing your cymbals and shells or lubricating lugs and tension rods goes a long way in extending a drum set’s life.

I hope this article allowed you to learn how to set up a drum set and avoid a lot of mistakes some drummers, like myself, had to go through at the beginning of our journey.

drum set back view
drum set back view 2